At some point, everyone ends up saving something on their computer. It might be a typed document, or a picture, or a spreadsheet, or a drawing… it doesn’t really matter. The point is, SAVING is how you keep something you’ve created so that next time you turn on your computer, it’s still there.
But when it comes to saving, there’s a question that I hear all the time, and it’s a good one.
“What’s the difference between SAVE versus SAVE AS?”
And that’s exactly what I want to talk about in today’s article.
WHAT IS SAVING?
I’ve already said that saving is how you keep something you’ve created on your computer for later. But it helps to understand what’s really happening behind the scenes.
Take a look at these three computer parts. They are what I call “the big three” that lets everything work on your computer.
- The CPU – the brain of your computer, carries out all the instructions
- RAM – the memory your CPU holds information in while it thinks
- Hard Drive – your long-term computer storage
Now, with regards to saving, here’s the most important thing to know about the big three.
Everything that you see and do on your computer screen is happening up in the computer’s memory.
For example, let’s say you’re typing a letter to your friend Jim using your favorite word-processor. As you type and see the words on the screen, they are all up in the computer’s memory. Memory is volatile, which means it needs power to work. When power is gone (such as when you turn off your computer), memory goes dead.
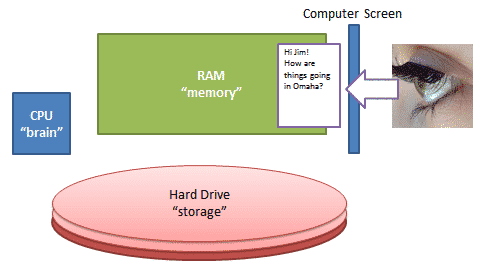
Now let’s say you’re done for the day, but aren’t done with the letter and want to work on it some more tomorrow. Before you quit your word-processor and turn off your computer, you need to SAVE your work. That’s because right now, the letter is all up in the computer’s memory which will be cleaned out when you quit the word-processor and shut down.
When you SAVE something, the CPU takes it from memory and copies it down to the hard drive, storing it as a computer file. The hard drive is magnetic in nature, so when the computer power goes off, what’s saved there is kept. That’s why your hard drive is used for long-term storage.
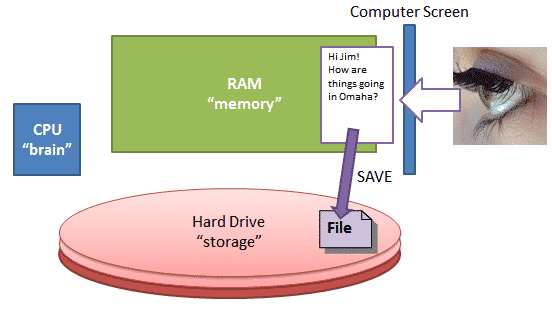
So, to summarize saving, it simply means to copy what you have created up in the computer’s memory down to the computer hard drive so that you can again use it later.
THE FIRST TIME YOU SAVE SOMETHING
To save something in most programs, such as the word-processor I just talked about, you go to the FILE menu or the File tab. But when you do, you don’t just see ONE saving option, you see TWO.
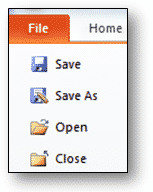 You see SAVE and SAVE AS.
So what’s the difference in Save versus Save As?
Well, the first time you save something (i.e. you’ve never saved it before and it’s not on the hard drive), SAVE and SAVE AS both work exactly the same. They open a new window called the SAVE AS window where you choose:
- What folder to save the file in
- What the file should be named
- (and in some cases) the File Type
Then when you click the SAVE button, your creation is saved as a file onto the hard drive, and you can quit the program and turn off your computer, knowing that you can go back later and open it from the file on the hard drive.
BEYOND THE FIRST SAVE – SAVE VERSUS SAVE AS
It’s AFTER you’ve saved something once that SAVE and SAVE AS on the File Menu become different.
When you go to the File Menu and choose OPEN to open something you’ve already saved to the hard drive, that item is copied from the hard drive up to the computers memory.
Then, as it sits in memory you can view and work on it.
For example, let’s say we saved the letter we were writing to our friend Jim as a file called Letter to Jim. Then later, we go back and OPEN it with our word-processor. The Letter to Jim is now up in the computer’s memory where you can make changes and/or add to it.
But here’s a VERY important point.
As you make the changes to the letter, those changes are only being made to the copy of the letter up in memory. (Remember, everything that you do and see on the computer screen is happening in memory).
So guess what you need to do once you are done making changes.
That’s right! You need to SAVE your work so that it goes copied back down to the hard drive.
AND THIS IS WHERE THE DIFFERENCE BETWEEN SAVE VERSUS SAVE AS ON THE FILE MENU COMES IN.
- With SAVE – The CPU copies the letter up in memory down to the hard drive and completely OVERWRITES the one that is already saved there as a file. When you click the SAVE option, no window opens, the CPU just does its work and then returns you to your program.
- With SAVE AS – The CPU copies the letter up in memory down to the hard drive, but opens the SAVE AS window and lets you save the letter as a NEW file, leaving the original one alone. So you end up with two copies of the letter… the original one you opened, and the new one you made the changes to.
SO WHICH DO I USE WHEN?
In most day to day saving situations, just using SAVE to overwrite your already saved file is the practical thing to do. In this case, your goal is to just make a change and update your saved file.
But in some situations you might have a reason to keep an original copy of your work, in case you someday need to go back to it and start over. In this case you’d want to use SAVE AS and create a separate file with your changes.
For example, in our “Working with Pictures” class we teach students to OPEN their original picture file, and then use SAVE AS to save the picture as a new file they can work on without fear of messing up, since they can always go back to the original file which has been left, untouched.
I hope this has helped to clear up some of the confusion about the File Menu and SAVE versus SAVE AS.





 You see


